


AWS-EKS-13--Kubectl
摘要
-
本文介绍kubectl命令的使用方法
-
参考资料:
kubectl命令
-
Kubernetes 提供 kubectl 是使用 Kubernetes API 与 Kubernetes 集群的控制面进行通信的命令行工具。
1 | $ kubectl help |
context[集群]相关
1 | # 查看client和server版本,注意此时必须连上server端 |
节点相关
1 | # 查看当前集群下的node |
namespace–ns相关
1 | # 获取当前集群下所有namespace |
pod–po相关
1 | # 获取当前namespace下的pod |
controller相关

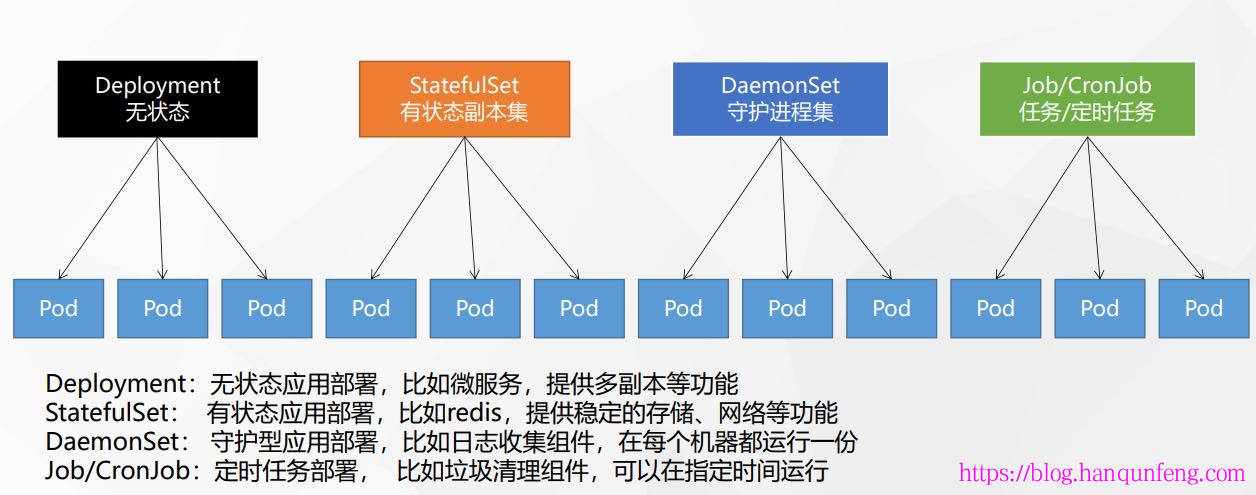
1 | # 获取当前namespace下的deployment |
deployment–deploy
1 | # deploy.yaml |
1 | # 命令行创建deploy |
daemonset–ds
-
每个node都会创建一个pod,当有新的node加入进来时,pod会自动被daemonset调度到新的node上,同理删除node,该node上的pod也会被移除
1 | # ds1.yaml |
1 | # 创建ds |
job
1 | # job.yaml |
1 | k apply -f job.yaml |
cronjob–cj
1 | # cronjob.yaml |
1 | k apply -f cronjob.yaml |
statefulset–sts
-
sts的特性
● 稳定的、唯一的网络标识。
● 稳定的、持久化的存储。
● 有序的、优雅的部署和扩展。
● 有序的、优雅的删除和停止。
1 | # sts.yaml |
1 | k apply -f sts.yaml |
label标签
-
controller和service等都是基于标签选择器关联pod的,所以在指定label时一定要准确唯一
1 | # 可以为任何资源设置标签 |
Configmap–cm
-
用来存储配置文件的 kubernetes 资源对象,配置内容都存储在 etcd 中
-
创建方法
1 | # 通过直接在命令行中指定 configmap 参数创建,即--from-literal |
-
使用方法
1 | ## 通过环境变量使用 |
Secrets
-
Secret 解决了密码、token、密钥等敏感数据的配置问题,而不需要把这些敏感数据暴露到镜像或者 Pod Spec 中。
-
Secret 可以以 Volume 或者环境变量的方式使用。
Secrets 类型
-
创建 Secret 时,你可以使用 Secret 资源的 type 字段,或者与其等价的 kubectl 命令行参数(如果有的话)为其设置类型。
-
Kubernetes 提供若干种内置的类型,用于一些常见的使用场景。 针对这些类型,Kubernetes 所执行的合法性检查操作以及对其所实施的限制各不相同。
| 内置类型 | 用法 |
|---|---|
Opaque |
用户定义的任意数据 |
kubernetes.io/service-account-token |
服务账号令牌 |
kubernetes.io/dockercfg |
~/.dockercfg 文件的序列化形式 |
kubernetes.io/dockerconfigjson |
~/.docker/config.json 文件的序列化形式 |
kubernetes.io/basic-auth |
用于基本身份认证的凭据 |
kubernetes.io/ssh-auth |
用于 SSH 身份认证的凭据 |
kubernetes.io/tls |
用于 TLS 客户端或者服务器端的数据 |
bootstrap.kubernetes.io/token |
启动引导令牌数据 |
-
通过为 Secret 对象的 type 字段设置一个非空的字符串值,你也可以定义并使用自己 Secret 类型(如果 type 值为空字符串,则被视为 Opaque 类型)。
-
关于Secret类型的进一步说请查看https://kubernetes.io/zh-cn/docs/concepts/configuration/secret/,以下示例仅对常用的
Opaque进行说明。
创建 Secret
1 | # 配置文件创建 |
使用 Secret
-
创建一个可以通过卷访问 Secret 数据的 Pod
1 | # secret-pod.yaml |
-
映射 Secret 键到特定文件路径
- 来自 mysecret 的键 username 可以在路径 /etc/foo/my-group/my-username 下供容器使用,而不是路径 /etc/foo/username
- 来自该 Secret 的键 password 没有映射到任何路径
1 | apiVersion: v1 |
-
使用来自 Secret 中的数据定义容器变量
1 | $ k create secret generic backend-user --from-literal=backend-username='backend-admin' |
-
将 Secret 中的所有键值偶对定义为环境变量
1 | $ k create secret generic test-secret --from-literal=username='my-app' --from-literal=password='39528$vdg7Jb' |
service–svc
-
svc负责解决端口映射的问题
-
Kubernetes ServiceTypes 允许指定你所需要的 Service 类型。
-
可用的 type 值及其行为有:
- ClusterIP
通过集群的内部 IP 暴露服务,选择该值时服务只能够在集群内部访问。 这也是你没有为服务显式指定 type 时使用的默认值。 你可以使用 Ingress 或者 Gateway API 向公众暴露服务。 - NodePort
通过每个节点上的 IP 和静态端口(NodePort)暴露服务。 为了让节点端口可用,Kubernetes 设置了集群 IP 地址,这等同于你请求 type: ClusterIP 的服务。 - LoadBalancer
使用云提供商的负载均衡器向外部暴露服务。 Kubernetes 不直接提供负载均衡组件;你必须提供一个,或者将你的 Kubernetes 集群与云提供商集成。 - ExternalName
将服务映射到 externalName 字段的内容(例如,映射到主机名 api.foo.bar.example)。 该映射将集群的 DNS 服务器配置为返回具有该外部主机名值的 CNAME 记录。 无需创建任何类型代理。
- ClusterIP
NodePort
-
可以让 kubernetes 在其所在节点上保留一个端口(所有节点上都使用相同的端口号),然后将传入的连接转发给 pod
1 | # svc-nodeport.yaml |
ClusterIP
-
提供虚拟ip
1 | # 基于delpoyment创建service |
-
Headless service clusterIP:基于statefulset创建service
- 不提供虚拟ip,而是返回具体的pod地址,并且基于如下规则查找:
${podName}.${headlessServiceName即svcName}.${namespace}.${clusterDomainName},
同一个namespace的pod访问时一般指定到{headlessServiceName}即可,跨namespace时需要指定到{namespace}
- 不提供虚拟ip,而是返回具体的pod地址,并且基于如下规则查找:
1 | # svc-sts-web.yaml |
LoadBalancer
-
相比 NodePort 方式可以通过任何节点的 指定 端口访问内部的 pod,LoadBalancer 方式拥有自己独一无二的可公开访问的 IP 地址;
-
LoadBalance 其实是 NodePort 的一种扩展,使得服务可以通过一个专用的负载均衡器来访问。
-
如果是自建k8s,Kubernetes 没 有 为 裸 机 集 群 提 供 网 络 负 载 平 衡 器 的 实 现,所以需要安装一个LoadBalancer,比如 MetaLb 负载均衡,这里不做赘述。
-
EKS安装 AWS Load Balancer Controller 附加组件后即可提供支持。
可以基于pod直接创建svc
1 | # 启动一个pod,默认的label是 run=nginx-app |
查看svc
1 | # 查看svc,注意查看TYPE,CLUSTER-IP ,EXTERNAL-IP,PORT显示的不同之处 |
Ingress
-
Ingress将来自集群外部的 HTTP 和 HTTPS 路由暴露给集群 内的服务。流量路由由 Ingress 资源上定义的规则控制。
-
私有k8s不提供Ingress,需要自行安装。
-
基于aws-eks等云服务通过安装 AWS Load Balancer Controller 附加组件提供Ingress功能。
1 | k get ing |
HPA:Horizontal Pod Autoscaler 自动弹性伸缩
-
实现hpa的前提是k8s集群中部署 metrics-server,其可对node和pod占用CPU、内存的情况进行监控。
1 | # 基于deployment创建hpa |
其它命令
1 | # 进入pod |