摘要
ShardingSphere-Proxy 简介
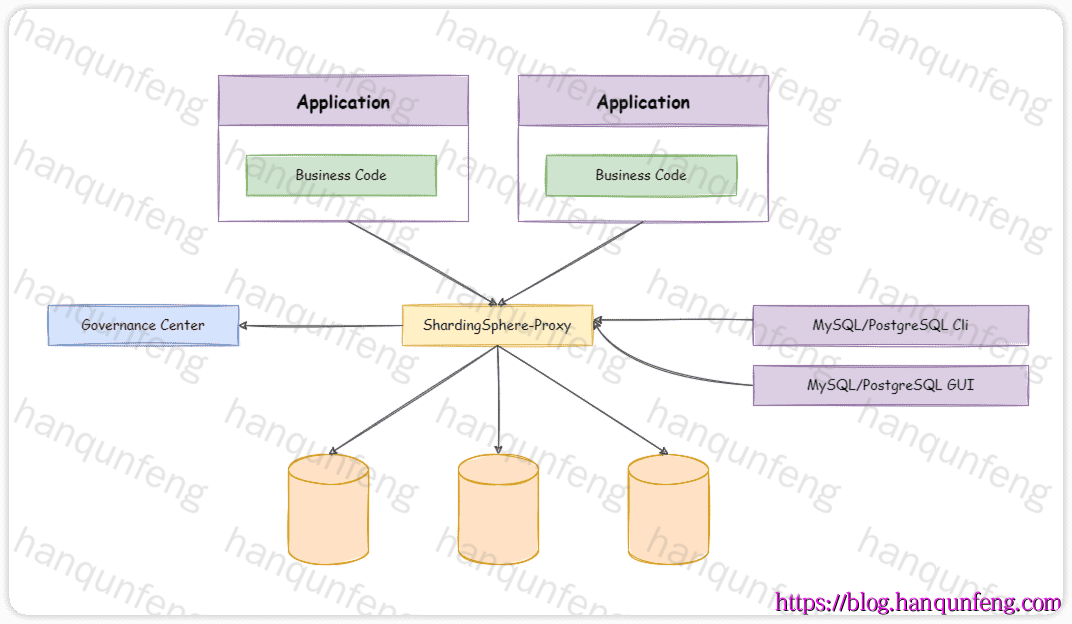
ShardingSphere-Proxy 定位为透明化的数据库代理端,通过实现数据库二进制协议,对异构语言提供支持。 目前提供 MySQL 和 PostgreSQL 协议,透明化数据库操作,对 DBA 更加友好。
向应用程序完全透明,可直接当做 MySQL/PostgreSQL 使用;
兼容 MariaDB 等基于 MySQL 协议的数据库,以及 openGauss 等基于 PostgreSQL 协议的数据库;
适用于任何兼容 MySQL/PostgreSQL 协议的的客户端,如:MySQL Command Client, MySQL Workbench, Navicat 等。
ShardingSphere-Proxy 独立部署架构图
ShardingSphere-Proxy 与 ShardingSphere-JDBC 的特性比较
特性
ShardingSphere-JDBC
ShardingSphere-Proxy
数据库支持 任意数据库
MySQL / PostgreSQL
连接消耗数 高
低
异构语言支持 仅支持 Java
支持任意语言
性能 损耗低
损耗略高
无中心化 是
否
静态入口 无
有
部署 ShardingSphere-Proxy
1
2
3
4
wget https://www.apache.org/dyn/closer.lua/shardingsphere/5.5.2/apache-shardingsphere-5.5.2-shardingsphere-proxy-bin.tar.gz tar -zxvf apache-shardingsphere-5.5.2-shardingsphere-proxy-bin.tar.gz cd apache-shardingsphere-5.5.2-shardingsphere-proxy-bin/
配置 ShardingSphere-Proxy
1 2 3 4 5 6 7 8 9 10 11 12 13 14 15 16 17 18 19 20 21 22 23 authority: users: - user: root@127.0.0.1 password: root admin: true - user: sharding@% password: sharding privilege: type: DATABASE_PERMITTED props: user-database-mappings: root@127.0.0.1=*,sharding@%=sharding_db transaction: defaultType: XA providerType: Atomikos props: sql-show: true check-table-metadata-enabled: false
注意:database-开头,实际上conf目录下有很多示例,我们可以根据需要进行配置global.yaml中的配置项不能配置到 database-my.yaml中
1 2 3 4 5 6 7 8 9 10 11 12 13 14 15 16 17 18 19 20 21 22 23 24 25 26 27 28 29 30 31 32 33 34 35 36 37 38 39 40 41 42 43 44 45 46 47 48 49 50 51 52 53 54 55 56 57 58 59 60 61 62 63 64 65 66 67 68 69 70 71 72 73 74 75 76 77 78 79 80 81 82 83 84 85 86 87 88 89 90 91 92 93 94 95 96 97 98 99 100 101 102 103 104 105 106 107 108 109 110 111 112 113 114 115 116 117 118 119 120 121 122 123 124 125 126 127 128 129 130 131 132 133 134 135 136 137 138 139 140 141 142 143 144 145 146 147 148 149 150 151 152 153 154 155 156 157 158 159 160 161 162 163 164 165 166 167 168 169 170 171 172 173 174 175 176 177 178 179 180 181 182 183 184 185 186 187 188 189 190 191 192 193 194 195 196 197 198 199 200 201 202 203 204 205 206 207 208 209 210 211 212 213 214 databaseName: sharding_db dataSources: ds_0: url: jdbc:mysql://127.0.0.1:3306/shardingdb0?useSSL=false&serverTimezone=UTC&useUnicode=true&characterEncoding=UTF-8 username: root password: newpwd ds_1: url: jdbc:mysql://127.0.0.1:3306/shardingdb1?useSSL=false&serverTimezone=UTC&useUnicode=true&characterEncoding=UTF-8 username: root password: newpwd rules: - !SHARDING bindingTables: - t_order,t_order_item tables: course: actualDataNodes: ds_${0..1}.course_${1..2} databaseStrategy: standard: shardingColumn: user_id shardingAlgorithmName: course_db_inline tableStrategy: standard: shardingColumn: cid shardingAlgorithmName: course_inline keyGenerateStrategy: column: cid keyGeneratorName: snowflake t_order_complex: actualDataNodes: ds_${0..1}.t_order_complex_${0..1} databaseStrategy: standard: shardingColumn: user_id shardingAlgorithmName: t_order_db_inline tableStrategy: complex: shardingColumns: user_id,order_id shardingAlgorithmName: t_order-complex-algorithm keyGenerateStrategy: column: order_id keyGeneratorName: snowflake t_order_item_complex: actualDataNodes: ds_${0..1}.t_order_item_complex_${0..1} databaseStrategy: standard: shardingColumn: user_id shardingAlgorithmName: t_order_db_inline tableStrategy: complex: shardingColumns: user_id,order_id shardingAlgorithmName: t_order_item-class-based-algorithm_spi keyGenerateStrategy: column: item_id keyGeneratorName: snowflake t_user: actualDataNodes: ds_${0..1}.t_user_${0..1} databaseStrategy: standard: shardingColumn: id shardingAlgorithmName: t_user_db_inline tableStrategy: standard: shardingColumn: id shardingAlgorithmName: t_user_inline keyGenerateStrategy: column: id keyGeneratorName: custom_snowflake_string autoTables: t_order: actualDataSources: ds_${0..1} shardingStrategy: standard: shardingColumn: user_id shardingAlgorithmName: mod_2 keyGenerateStrategy: column: order_id keyGeneratorName: snowflake t_order_item: actualDataSources: ds_${0..1} shardingStrategy: standard: shardingColumn: user_id shardingAlgorithmName: mod_2 keyGenerateStrategy: column: item_id keyGeneratorName: snowflake shardingAlgorithms: course_inline: type: INLINE props: algorithm-expression: course_${cid % 2 + 1 } allow-range-query-with-inline-sharding: true course_db_inline: type: INLINE props: algorithm-expression: ds_${user_id % 2 } mod_2: type: MOD props: sharding-count: 2 t_order_db_inline: type: INLINE props: algorithm-expression: ds_${user_id % 2 } t_order-complex-algorithm: type: COMPLEX_INLINE props: algorithm-expression: t_order_complex_${(user_id + order_id + 1 ) % 2 } t_order_item-class-based-algorithm_spi: type: T_ORDER_ITEM_COMPLEX t_user_db_inline: type: INLINE props: algorithm-expression: ds_${Math.abs(id.hashCode()%2)} t_user_inline: type: INLINE props: algorithm-expression: t_user_${Math.abs(id.hashCode()%4).intdiv(2)} keyGenerators: snowflake: type: SNOWFLAKE uuid: type: UUID custom_snowflake_string: type: CUSTOM_SNOWFLAKE_STRING props: workerId: 2 datacenterId: 2 - !BROADCAST tables: - dict - !ENCRYPT tables: t_user: columns: password: cipher: name: password encryptorName: aes_encryptor encryptors: aes_encryptor: type: AES props: aes-key-value: 123456abc digest-algorithm-name: SHA-1 md5_encryptor: type: MD5 props: salt: 123456 - !MASK tables: t_user: columns: password: maskAlgorithm: md5_mask email: maskAlgorithm: mask_before_special_chars_mask telephone: maskAlgorithm: keep_first_n_last_m_mask name: maskAlgorithm: my_mask maskAlgorithms: md5_mask: type: MD5 mask_before_special_chars_mask: type: MASK_BEFORE_SPECIAL_CHARS props: special-chars: '@' replace-char: '*' keep_first_n_last_m_mask: type: KEEP_FIRST_N_LAST_M props: first-n: 3 last-m: 4 replace-char: '*' my_mask: type: MY_CUSTOM_MASK props: replace-char: "#" - !SINGLE tables: - ds_0.t_address
1
2
3
4
cd apache-shardingsphere-5.5.2-shardingsphere-proxy-bin/mkdir ext-libcd ext-libwget https://repo1.maven.org/maven2/mysql/mysql-connector-java/8.0.11/mysql-connector-java-8.0.11.jar
1 2 3 4 5 6 7 8 9 10 11 12 13 14 15 git clone --filter=blob:none --sparse https://github.com/hanqunfeng/springbootchapter.git cd springbootchaptergit sparse-checkout set springboot3-demo/shardingsphere-demo/algorithm-swapper cd springboot3-demo/shardingsphere-demo/algorithm-swappermvn clean package -DskipTests cp target/algorithm-swapper-1.0.0.jar $shardingsphere -proxy$/ext-lib
启动与关闭 ShardingSphere Proxy
1
2
3
4
5
cd $shardingsphere -proxy$/bin./start.sh ./stop.sh
参数
说明
默认值
-a绑定地址,可以是 IPv4、IPv6 或主机名,多个地址用逗号分隔。
0.0.0.0
-p绑定端口号,可以在 global.yaml 中修改。-p 优先级更高
3307
-cShardingSphere-Proxy 配置目录路径。
conf
-f强制启动 ShardingSphere-Proxy。
无
-g如果在 agent 目录下部署了 shardingsphere-agent,启用 agent 功能。
无
-s指定用于连接的 socket 文件路径。
无
场景
命令示例
说明
默认启动 ./start.sh默认端口 3307,配置目录 conf
指定端口和配置目录 ./start.sh 3308 /opt/shardingsphere-proxy/conf简写模式,指定端口和配置目录
参数形式启动 ./start.sh -p 3308 -c /opt/shardingsphere-proxy/conf与上面等效,但更明确
指定监听地址 ./start.sh -a 192.168.1.100 -p 3307 -c conf指定单个 IP 地址
指定多个监听地址 ./start.sh -a 192.168.1.100,127.0.0.1 -p 3307 -c conf多个地址用逗号分隔
强制启动 ./start.sh -p 3307 -c conf -f遇到残留 PID 文件时使用
启用 agent ./start.sh -p 3307 -c conf -g启动 ShardingSphere-Agent
使用 Unix Socket ./start.sh -p 3307 -c conf -s /tmp/sharding-proxy.sock通过 Socket 文件进行连接
多选项组合 ./start.sh -a 127.0.0.1 -p 3310 -c /opt/proxy/conf -f -g -s /tmp/proxy.sock一次性指定多个选项
项目连接 ShardingSphere-Proxy 时,就像连接普通的 mysql 服务一样
后记
在 ShardingSphere + MySQL 下建议避免或谨慎使用的 SQL 清单
SQL 场景
原因
建议处理方式
多表复杂 JOIN(特别是跨分片)
需要跨库数据聚合,性能差,可能报错
使用广播表/绑定表,或在应用层完成
跨分片子查询
SQL 路由困难,可能不支持
尽量改成单表查询或分步查询
跨分片的 GROUP BY / ORDER BY
在 Proxy 层聚合,性能很差
尽量避免,或控制数据量
SQL 场景
原因
建议处理方式
ALTER TABLE 复杂变更需在所有分片执行,可能执行失败
手动在每个分片库执行
CREATE TRIGGER、PROCEDUREProxy 不解析这些语法,直接透传不安全
尽量在单库手动创建
CREATE FUNCTION同上
单库执行或应用层替代
FULLTEXT INDEX、SPATIAL INDEX分片环境下无法自动维护索引
单库手动维护或避免使用
SQL 场景
原因
建议处理方式
LOAD DATA INFILEProxy 不支持文件系统直接访问
在分片库手动执行或通过应用导入
SELECT ... INTO OUTFILE同上
应用层处理导出
功能
支持情况
建议
MySQL 8.0 公共表表达式(CTE)
部分支持
避免跨分片使用
窗口函数(OVER() PARTITION BY)
部分支持
避免跨分片大数据量使用
JSON 函数
基本支持
单表场景可用,跨分片需谨慎
场景
问题原因
建议处理方式
跨分片原生事务
MySQL 原生事务不支持跨库
使用 ShardingSphere XA / BASE
大事务 + 分布式事务
性能开销大
尽量控制事务范围