


SpringBoot3 + ShardingSphere-JDBC5.5.2 分库分表
摘要
-
本文介绍 SpringBoot3.5.5 + ShardingSphere-JDBC5.5.2 分库分表的使用。
ShardingSphere-JDBC 简介
-
ShardingSphere-JDBC 定位为轻量级 Java 框架,在 Java 的 JDBC 层提供的额外服务。 它使用客户端直连数据库,以 jar 包形式提供服务,无需额外部署和依赖,可理解为增强版的 JDBC 驱动,完全兼容 JDBC 和各种 ORM 框架。
- 适用于任何基于 JDBC 的 ORM 框架,如:JPA, Hibernate, Mybatis, Spring JDBC Template 或直接使用 JDBC;
- 支持任何第三方的数据库连接池,如:DBCP, C3P0, BoneCP, HikariCP 等;
- 支持任意实现 JDBC 规范的数据库,目前支持 MySQL,PostgreSQL,Oracle,SQLServer 以及任何可使用 JDBC 访问的数据库。
-
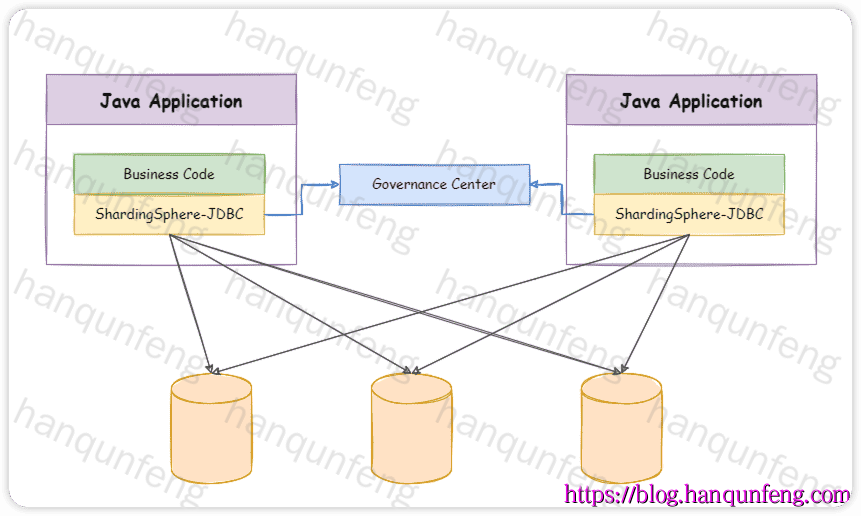
ShardingSphere-JDBC 独立部署架构图
maven依赖
1 | <!-- 本项目 基于 mysql --> |
application.yml
1 | spring: |
-
也可以不在
application.yml中配置,而是通过@Configuration创建@Bean,这样就可以配置多数据源了。
1 |
|
sharding.yaml
-
完整配置,下文会介绍部分配置
1 | # 数据源配置: https://shardingsphere.apache.org/document/current/cn/user-manual/shardingsphere-jdbc/yaml-config/data-source/ |
数据源配置
-
hikari + mysql
1 | dataSources: |
-
druid + mysql
1 | dataSources: |
-
druid + mysql + p6spy
1 | dataSources: |
分库分表配置
单分片键,Long 类型
1 | rules: |
-
这里分库与分表采用了不同的字段,分库使用 user_id,分表使用 cid
-
allow-range-query-with-inline-sharding: true ,这里设置为允许范围查询,默认值是 false,不允许 between 查询
单分片键,String 类型
1 | rules: |
-
这里分库与分表采用了相同的字段,即主键id,因其为字符串类型,所以需要使用 hashCode() 获取数字,再进行运算
-
主键获取规则使用的自定义的雪花算法,spi,详见
src/main/resources/META-INF/services/org.apache.shardingsphere.infra.algorithm.keygen.core.KeyGenerateAlgorithm,这里注意,从5.5.3开始会更换为org.apache.shardingsphere.infra.algorithm.keygen.spi.KeyGenerateAlgorithm
多分片键,Long 类型
1 | rules: |
-
多个分片键,
t_order_complex表使用了内置的COMPLEX_INLINE算法,而t_order_item_complex表使用了自定义的的分片算法,spi,详见src/main/resources/META-INF/services/org.apache.shardingsphere.sharding.spi.ShardingAlgorithm
自动分片规则
-
上面介绍的都是手工配置分片规则,用于配置较为复杂的分片规则,如果分片规则比价简单,可以使用自动分片规则
1 | rules: |
-
自动分片规则需要声明数据库,但不需要声明表分配规则,其根据分片算法自动确定具体的数据表。
-
同时这里还配置了
bindingTables,用来指定其分片路由一致。
广播表配置
-
广播表,即所有数据源都包含的表,比如字典表
1 | rules: |
数据加密规则
1 | rules: |
-
配置加密字段规则后,新增数据时,会自动对加密字段加密后存储,查询时也会加密后进行比较查询。
数据脱敏规则
1 | rules: |
-
被脱敏的字段在查询时会进行脱敏展示。
-
这里还自定义了脱敏算法,spi,详见
src/main/resources/META-INF/services/org.apache.shardingsphere.mask.spi.MaskAlgorithm
单表规则
-
即不需要进行分库分表的表
1 | rules: |
属性配置
1 | # 属性配置:https://shardingsphere.apache.org/document/current/cn/user-manual/common-config/props/ |
事务配置
1 | # https://shardingsphere.apache.org/document/5.5.2/cn/user-manual/shardingsphere-jdbc/yaml-config/rules/transaction/ |
后记
-
springboot3 集成 shardingsphere-JDBC5.5.2 与 springboot2 不同,不再提供
springboot-starter-shardingsphere,相关配置也采用了独立的配置文件。 -
代码中包含两个库中使用到的数据库脚本,
shardingsphere-demo/shardingsphere-demo-01/sql -
具体使用效果可以通过项目中提供的单元测试类进行验证。
-
springboot3 集成 shardingsphere-JDBC5.5.2 目前尚不支持
XA分布式事务,这是因为从Spring Boot 3.x开始,就全面迁移到了Jakarta EE 9+,也就是说,所有javax.*的类都迁移到jakarta.*命名空间(事务、JPA、Servlet 等 API 都受影响),而ShardingSphere 5.5中的 XA 事务主要依赖Atomikos或Narayana等第三方分布式事务管理器,这些库目前大部分还是基于javax.transaction.*的 API。