Poetry--轻量级的python包管理器

摘要

  • Poetry是一个轻量级的python包管理器,其目标是帮助开发者快速、轻松地构建、发布和分享python包。说它轻量,是与 conda 相比 poetry 更轻量,同时与 venv + pip Python--virtualenv 的方式相比具有如下优点:
    • 使用缓存机制,避免重复下载依赖包
    • 包管理上更加精确,删除不需要的包时会同时删除与其关联的且没有被使用的那些依赖包,避免无用的依赖包造成打包体积过大
    • 打包和发布更加简单,只需要一个命令就可以打包和发布

安装

1
2
3
4
5
6
7
8
9
10
11
12
13
14
# 官方推荐使用pipx安装,当然也可以使用 pip
$ pipx install poetry

# 查看是否安装成功
$ poetry --version
Poetry (version 1.8.4)

# 添加命令自动补全
$ mkdir ~/.zfunc
$ poetry completions zsh > ~/.zfunc/_poetry

# 在 ~/.zshrc 中添加以下配置(我是用的是zsh,其他shell可以参考官方文档)
fpath+=~/.zfunc
autoload -Uz compinit && compinit

pipx简介

  • pipx 是一个 Python 包管理工具,使用pipx安装工具包时,每个工具都会被安装在一个独立的虚拟环境中,避免不同工具之间的依赖冲突。

  • 场景:两个工具依赖不同版本的同一个库
    假设我们有两个命令行工具:

    工具A 依赖于 requests 库的版本 2.27.1。
    工具B 依赖于 requests 库的版本 2.31.0。

    如果使用 pip 安装
    工具会被安装到全局环境,共享相同的依赖版本:

    1
    2
    pip install toolA  # 安装时会安装 requests 2.27.1
    pip install toolB # 安装时会将 requests 升级到 2.31.0

    结果:
    当你运行工具A时,它可能会报错,因为它依赖的 requests 2.27.1 已被 requests 2.31.0 替换。
    全局环境中的所有工具都共享一个 requests,版本冲突不可避免。

    如果使用 pipx 安装
    每个工具会被安装到独立的虚拟环境中,各自的依赖互不影响:

    1
    2
    pipx install toolA  # 在虚拟环境A中安装 toolA 和 requests 2.27.1
    pipx install toolB # 在虚拟环境B中安装 toolB 和 requests 2.31.0

    结果:
    虚拟环境A 只包含 toolA 和它的依赖 requests 2.27.1。
    虚拟环境B 只包含 toolB 和它的依赖 requests 2.31.0。
    工具之间完全隔离,不会因为依赖版本冲突而导致问题。

  • 所以,当需要安装全局命令行工具时,使用pipx是个很好的选择

  • pipx 的安装

1
2
3
4
5
6
7
8
9
10
11
12
13
14
15
# 安装pipx
pip install pipx
# 配置环境变量,运行该命令会将
pipx ensurepath
# 运行上面的命令会将如下内容加入你的shell配置文件中,我的是 .zshrc 文件,实际上你也可以手工添加该配置,将$HOME/.local/bin放到前面更好一些。
export PATH="$PATH:$HOME/.local/bin"
# 注意添加完成后要重启shell

# 添加pipx自动代码补全
# 运行如下命令,并根据提示完成
pipx completions
# 我的是zsh,所以在 .zshrc中添加如下内容
autoload -Uz compinit && compinit # 如果没有添加过就需要先添加这个
eval "$(register-python-argcomplete pipx)" # 添加自动代码补全
# 注意添加完成后要重启shell

查看所有命令

我已经将其翻译为中文

1
2
3
4
5
6
7
8
9
10
11
12
13
14
15
16
17
18
19
20
21
22
23
24
25
26
27
28
29
30
31
32
33
34
35
36
37
38
39
40
41
42
43
44
45
46
47
48
49
50
51
52
53
54
55
56
57
58
59
60
61
62
63
64
65
66
67
$ poetry list
Poetry (版本 1.8.4)

用法:
command [选项] [参数]

选项:
-h, --help 显示给定命令的帮助。如果没有指定命令,则显示列表命令的帮助。
-q, --quiet 不输出任何消息。
-V, --version 显示此应用程序版本。
--ansi 强制输出ANSI格式。
--no-ansi 禁用ANSI输出。
-n, --no-interaction 不要提问任何交互性问题。
--no-plugins 禁用插件。
--no-cache 禁用源缓存。
-C, --directory=目录 Poetry命令的工作目录(默认为当前工作目录)。
-v|vv|vvv, --verbose 增加消息的冗长度:1 表示正常输出,2 表示更详细的输出,3 表示调试。

可用命令:
about 显示关于Poetry的信息。
add 将新依赖项添加到pyproject.toml并安装它。
build 默认构建一个包,分别是tarball和wheel。
check 验证pyproject.toml文件的内容及其与poetry.lock文件的一致性。
config 管理配置设置。
export 将锁文件导出到其他格式。
help 显示特定命令的帮助。
init 在当前目录创建一个基础的pyproject.toml文件。
install 安装项目依赖项。
list 列出命令。
lock 锁定项目依赖项。
new 在<path>处创建一个新的Python项目。
publish 将包发布到远程仓库。
remove 从项目依赖项中移除包。
run 在适当的环境中运行命令。
search 在远程仓库中搜索包。
shell 在虚拟环境中启动shell。
show 显示有关包的信息。
update 根据pyproject.toml文件更新依赖项。
version 显示项目的版本或在提供有效版本规则时更新它。

缓存
cache clear 按名称清除Poetry缓存。
cache list 列出Poetry的缓存列表。

调试
debug info 显示调试信息。
debug resolve 调试依赖项解析。

环境
env info 显示当前环境的信息。
env list 列出与当前项目关联的所有虚拟环境。
env remove 移除与项目关联的虚拟环境。
env use 激活或创建当前项目的新的虚拟环境。

自身
self add 向Poetry的运行时环境添加其他包。
self install 安装此Poetry安装所需的锁定包(包括插件)。
self lock 锁定Poetry安装的系统要求。
self remove 从Poetry的运行时环境中移除其他包。
self show 显示Poetry运行时环境中的包。
self show plugins 显示当前已安装插件的信息。
self update 更新Poetry到最新版本。


source add 为项目添加源配置。
source remove 移除为项目配置的源。
source show 显示为项目配置的源信息。

常用命令

  • 这里只对日常开发中比较常用的命令进行简要说明,详细介绍可以参考官方文档

new : 创建项目

1
2
3
4
5
6
7
8
9
10
11
12
13
14
15
16
17
18
19
20
21
22
23
24
25
26
27
28
29
30
31
# 按照默认规则创建一个基于 poetry 的项目
$ poetry new my-project
Created package my_project in my-project
$ cd my-project

# 查看生成的目录结构
$ exa -T
.
├── my_project
│ └── __init__.py
├── pyproject.toml
├── README.md
└── tests
└── __init__.py

# 查看 pyproject.toml 内容,该文件为项目的配置的配置文件
$ more pyproject.toml
[tool.poetry]
name = "my-project"
version = "0.1.0"
description = ""
authors = ["hanqunfeng <hanqf2008@163.com>"]
readme = "README.md"

[tool.poetry.dependencies]
python = "^3.11"


[build-system]
requires = ["poetry-core"]
build-backend = "poetry.core.masonry.api"

init : 初始化一个已有的项目目录

1
2
3
4
5
6
7
8
9
10
11
12
13
14
15
16
17
18
19
20
21
22
23
24
25
26
27
28
29
30
31
32
33
34
35
36
37
38
39
40
41
42
43
44
45
46
47
# 假设我们已经有个项目目录,目录名称为 poetryDemo
$ cd poetryDemo
# 初始化 poetryDemo ,在当前目录下创建 pyproject.toml 文件,注意该操作只会创建该文件,包目录以及readme文件都没有,需要手工创建
$ poetry init
This command will guide you through creating your pyproject.toml config.

Package name [poetrydemo]: # 包名称
Version [0.1.0]: # 版本号
Description []: # 描述信息
Author [hanqunfeng <hanqf2008@163.com>, n to skip]: # 作者
License []: # License
Compatible Python versions [^3.11]: # python 版本

Would you like to define your main dependencies interactively? (yes/no) [yes] # 您想以交互方式定义您的主环境依赖关系吗?默认yes
You can specify a package in the following forms: # 您可以按以下形式指定包:
- A single name (requests): this will search for matches on PyPI # 单个名称(requests):这将在官方仓库PyPI上搜索匹配项,如果指定了其它镜像源就会从指定的源下载
- A name and a constraint (requests@^2.23.0) # 名称和版本约束
- A git url (git+https://github.com/python-poetry/poetry.git) # git地址
- A git url with a revision (git+https://github.com/python-poetry/poetry.git#develop) # git地址,指定某个分支
- A file path (../my-package/my-package.whl) # 文件路径
- A directory (../my-package/) # 目录路径
- A url (https://example.com/packages/my-package-0.1.0.tar.gz) # 一个安装包的地址

Package to add or search for (leave blank to skip): # 添加主环境依赖,按上面的格式要求填写

Would you like to define your development dependencies interactively? (yes/no) [yes] # 您想以交互方式定义您的开发依赖关系吗?默认yes
Package to add or search for (leave blank to skip): # 添加开发环境依赖,按上面的格式要求填写

Generated file
# 要生成的 pyproject.toml 内容
[tool.poetry]
name = "poetrydemo" # 包名称
version = "0.1.0" # 版本
description = "" # 描述信息
authors = ["hanqunfeng <hanqf2008@163.com>"] # 作者信息
readme = "README.md" # 说明文件

[tool.poetry.dependencies] # 主环境依赖
python = "^3.11"


[build-system]
requires = ["poetry-core"]
build-backend = "poetry.core.masonry.api"


Do you confirm generation? (yes/no) [yes] # 确认是否按照上面的内容创建 pyproject.toml 文件,默认yes
  • 上面的方式在初始化时会询问你相关的信息,如果你希望都用默认值的话,可以使用如下命令

1
poetry init -n

config : poetry的全局配置

  • 查看全局配置

1
2
3
4
5
6
7
8
9
10
11
12
13
14
15
16
17
18
19
$ poetry config --list
cache-dir = "/Users/hanqf/Library/Caches/pypoetry" # 缓存目录,用于存储项目依赖和虚拟环境等缓存信息。
experimental.system-git-client = false # 是否使用系统自带的git客户端,false表示使用Poetry内置的git客户端
installer.max-workers = null # 安装依赖时的最大线程数,null表示使用默认线程数,可以设置为cpu核数+4
installer.modern-installation = true # 是否使用Poetry的现代安装方案,true表示使用
installer.no-binary = null # 是否不使用预编译的二进制包,null表示不限制
installer.parallel = true # 是否并行安装依赖,true表示并行安装
keyring.enabled = true # 是否启用密钥环(keyring)以保存认证信息。true 表示启用。
solver.lazy-wheel = true # 是否延迟解析 wheel 包。true 表示延迟解析。
virtualenvs.create = true # 是否自动创建虚拟环境,true表示创建
virtualenvs.in-project = null # 是否在项目内创建虚拟环境,null 表示使用默认值(通常为 false),即不在项目中创建。true表示在项目中创建
virtualenvs.options.always-copy = false # 如果设置为 true,Poetry 会始终复制文件到虚拟环境中,而不是使用符号链接(symlinks)。这可以避免某些系统上的权限问题,但会增加虚拟环境的存储需求。
virtualenvs.options.no-pip = false # 如果设置为 true,Poetry 在创建虚拟环境时不会安装 pip。如果你的项目不需要直接使用 pip,并且你希望通过 Poetry 管理所有的依赖项,可以将 no-pip 设置为 true,以减少虚拟环境中的不必要的依赖项。
virtualenvs.options.no-setuptools = false # 如果设置为 true,Poetry 在创建虚拟环境时不会安装 setuptools。默认情况下,Poetry 会安装 pip 和 setuptools,以便你可以使用这些工具来管理依赖项。
virtualenvs.options.system-site-packages = false # 默认值false,此时 Poetry 创建的虚拟环境将不会包含全局 Python 安装的 site-packages 目录中的包。这有助于确保项目依赖项的隔离性,避免与系统中的其他包发生冲突。
virtualenvs.path = "{cache-dir}/virtualenvs" # /Users/hanqf/Library/Caches/pypoetry/virtualenvs # 虚拟环境存放的路径,如果virtualenvs.in-project设置为true,就只会在项目中创建
virtualenvs.prefer-active-python = false # 是否优先使用系统激活的Python解释器
virtualenvs.prompt = "{project_name}-py{python_version}" # 虚拟环境的命令提示格式
warnings.export = true # 是否在导出时显示警告信息。true 表示显示
  • 修改全局配置

1
2
3
4
5
6
7
8
9
10
11
12
13
14
15
16
17
# 修改全局配置,此后会在项目目录下创建 .venv 目录存放虚拟环境
$ poetry config virtualenvs.in-project true
# 进入虚拟环境,如果虚拟环境尚未创建会自动创建
$ poetry shell
# 退出虚拟环境
$ exit

# 只对当前项目有效,此时会在当前项目目录下创建 poetry.toml 来保存这些配置信息
$ poetry config virtualenvs.in-project true --local
$ poetry config virtualenvs.options.system-site-packages true --local
$ more poetry.toml
[virtualenvs]
in-project = true
[virtualenvs.options]
system-site-packages = true

# 这里要注意 virtualenvs 下的属性必须在创建虚拟环境前设置才会有效

env : 虚拟环境管理

  • Poetry 会在你第一次运行某些命令(如 poetry shell 或者 poetry add somepackage)时自动创建虚拟环境。

  • 不过这种时候都是使用系统默认的python来创建虚拟环境,如果系统中安装了多个python,则可以通过如下方式设置虚拟环境要使用哪个python版本

  • 创建/切换虚拟环境

1
2
3
4
5
6
7
8
9
# 指定python的版本,这会从python的默认安装路径下查找对应的版本
# 比如macOs会从该路径下查找:/Library/Frameworks/Python.framework/Versions
$ poetry env use 3.11

# 如果可以直接在命令行使用python命令,比如:python3.12 -V,则可以使用如下方式创建虚拟环境
$ poetry env use python3.12

# 如果python安装到了其它路径,可以指定python安装路径
$ poetry env use /pythonDir/3.13/bin/python3
  • 查看当前项目的虚拟环境信息

1
2
3
4
5
6
7
8
9
10
11
12
13
14
15
16
17
18
19
20
21
22
23
24
25
26
27
28
29
30
31
32
33
34
35
36
37
38
39
40
# 创建一个基于 python3.13 的虚拟环境
$ poetry env use python3.13
Creating virtualenv poetrydemo-fyqYbfje-py3.13 in /Users/hanqf/Library/Caches/pypoetry/virtualenvs
Using virtualenv: /Users/hanqf/Library/Caches/pypoetry/virtualenvs/poetrydemo-fyqYbfje-py3.13
# 再创建一个基于 python3.11 的虚拟环境,最后被use的处于默认激活状态
$ poetry env use python3.11
Creating virtualenv poetrydemo-fyqYbfje-py3.11 in /Users/hanqf/Library/Caches/pypoetry/virtualenvs
Using virtualenv: /Users/hanqf/Library/Caches/pypoetry/virtualenvs/poetrydemo-fyqYbfje-py3.11
# 查看当前项目有多少个虚拟环境
$ poetry env list
poetrydemo-fyqYbfje-py3.11 (Activated) # poetrydemo-fyqYbfje-py3.11 表示虚拟环境名称,Activated表示当前虚拟环境已经被激活
poetrydemo-fyqYbfje-py3.13

# 查看虚拟化环境路径
$ poetry env list --full-path
/Users/hanqf/Library/Caches/pypoetry/virtualenvs/poetrydemo-fyqYbfje-py3.11 (Activated)

# 查看当前激活的虚拟环境信息
$ poetry env info

Virtualenv
Python: 3.11.3
Implementation: CPython
Path: /Users/hanqf/Library/Caches/pypoetry/virtualenvs/poetrydemo-fyqYbfje-py3.11
Executable: /Users/hanqf/Library/Caches/pypoetry/virtualenvs/poetrydemo-fyqYbfje-py3.11/bin/python
Valid: True

Base
Platform: darwin
OS: posix
Python: 3.11.3
Path: /Library/Frameworks/Python.framework/Versions/3.11
Executable: /Library/Frameworks/Python.framework/Versions/3.11/bin/python3.11

# 删除虚拟环境
$ poetry env remove python3.13
Deleted virtualenv: /Users/hanqf/Library/Caches/pypoetry/virtualenvs/poetrydemo-fyqYbfje-py3.13

# 删除全部虚拟环境
$ poetry env remove --all
  • 注意,当virtualenvs.in-project被设置为true时,即只在项目目录下创建虚拟环境时,只会保留一个环境,即.venv

  • 切换到新的虚拟环境时会全新创建一个新的环境,原先的环境会被删除,所以要使用poetry install命令重新安装依赖

1
2
3
4
5
6
7
8
9
10
11
12
13
14
15
16
17
18
19
20
21
22
23
24

$ poetry env use python3.11
Recreating virtualenv poetrydemo in /Users/hanqf/Desktop/pythonDir/poetryDir/poetryDemo/.venv
Using virtualenv: /Users/hanqf/Desktop/pythonDir/poetryDir/poetryDemo/.venv

$ poetry env list # 虽然可以通过 poetry env use 的方式来创建新的虚拟环境,但实际上只会有一个环境被保留,所以这里只会显示一个
.venv (Activated) # .venv 表示虚拟环境名称,Activated表示当前虚拟环境已经被激活

# 查看虚拟环境信息
$ poetry env info

Virtualenv
Python: 3.11.3
Implementation: CPython
Path: /Users/hanqf/Desktop/pythonDir/poetryDir/poetryDemo/.venv
Executable: /Users/hanqf/Desktop/pythonDir/poetryDir/poetryDemo/.venv/bin/python
Valid: True

Base
Platform: darwin
OS: posix
Python: 3.11.3
Path: /Library/Frameworks/Python.framework/Versions/3.11
Executable: /Library/Frameworks/Python.framework/Versions/3.11/bin/python3.11

依赖包管理

  • add : 安装依赖包

这个命令会修改 pyproject.toml 文件,在 [tool.poetry.dependencies] 部分添加新的依赖项。还会自动更新 poetry.lock 文件,锁定依赖的确切版本。

1
2
3
4
5
6
7
8
9
10
11
12
13
14
15
16
17
18
19
20
21
22
23
24
25
26
27
28
29
30
31
32
33
34
35
36
37
38
39
40
41
42
43
44
45
46
47
48
49
50
51
52
53
54
55
56
# 安装依赖,安装后会将依赖信息写入 pyproject.toml 中
# 不指定版本则安装最新版
$ poetry add fastapi
Using version ^0.115.5 for fastapi

Updating dependencies
Resolving dependencies... (1.3s)

Package operations: 9 installs, 0 updates, 0 removals

- Installing idna (3.10)
- Installing sniffio (1.3.1)
- Installing typing-extensions (4.12.2)
- Installing annotated-types (0.7.0)
- Installing anyio (4.6.2.post1)
- Installing pydantic-core (2.23.4)
- Installing pydantic (2.9.2)
- Installing starlette (0.41.3)
- Installing fastapi (0.115.5)

Writing lock file

# 指定版本号安装依赖
poetry add package_name@^1.2.3
# 规则说明
^1.2.3 表示兼容 1.2.3 及更高的小版本,但不包括 2.0.0。 如:poetry add requests@^2.28.0
~1.2.3:允许升级到 1.2.x,但不包括 1.3.0。 如:poetry add requests@~2.28.0
1.2.3:固定为 1.2.3。 如:poetry add requests@2.28.0
>=1.2.3:允许使用 1.2.3 及以上版本。注意zsh下要加上双引号,如:poetry add "requests@>=2.28.0"
<2.0.0:允许使用小于 2.0.0 的版本。 注意zsh下要加上双引号,如:poetry add "requests@<3.0.0"

# 安装到指定的分组,默认都是安装到主环境中的,poetry build默认只会打包主环境的依赖
poetry add flask # 安装到主环境中
poetry add flask --group=test #添加分组名 test
poetry add flask --dev #相当于--group=dev
# 分别执行上面3个安装命令后,输出 pyproject.toml 的内容如下
[tool.poetry]
name = "poetrydemo"
version = "0.1.0"
description = ""
authors = ["hanqunfeng <hanqf2008@163.com>"]
readme = "README.md"

[tool.poetry.dependencies] # 主环境
python = "^3.11"
flask = "^3.1.0"

[tool.poetry.group.test.dependencies] # test分组依赖
flask = "^3.1.0"

[tool.poetry.group.dev.dependencies] # dev分组依赖
flask = "^3.1.0"

[build-system]
requires = ["poetry-core"]
build-backend = "poetry.core.masonry.api"
  • show : 查看依赖包

1
2
3
4
5
6
7
8
9
10
11
12
13
14
15
# 查看当前项目都需要哪些依赖,这些依赖不一定都安装了,它只是解析 pyproject.toml 中的声明来解析依赖树
$ poetry show
annotated-types 0.7.0 Reusable constraint types to use with typing.Annotated
anyio 4.6.2.post1 High level compatibility layer for multiple asynchronous ...
fastapi 0.115.5 FastAPI framework, high performance, easy to learn, fast ...
idna 3.10 Internationalized Domain Names in Applications (IDNA)
pydantic 2.9.2 Data validation using Python type hints
pydantic-core 2.23.4 Core functionality for Pydantic validation and serialization
sniffio 1.3.1 Sniff out which async library your code is running under
starlette 0.41.3 The little ASGI library that shines.
typing-extensions 4.12.2 Backported and Experimental Type Hints for Python 3.8+

# 只查看顶级依赖,即只查看在 pyproject.toml 中声明的依赖
$ poetry show --top-level
fastapi 0.115.5 FastAPI framework, high performance, easy to learn, fast ...
  • remove : 删除依赖包

1
2
3
4
5
6
7
8
9
10
11
12
13
14
15
16
17
18
# 删除依赖,此时会将当前包及其所有依赖一块删除
$ poetry remove fastapi
Updating dependencies
Resolving dependencies... (0.1s)

Package operations: 0 installs, 0 updates, 9 removals

- Removing annotated-types (0.7.0)
- Removing anyio (4.6.2.post1)
- Removing fastapi (0.115.5)
- Removing idna (3.10)
- Removing pydantic (2.9.2)
- Removing pydantic-core (2.23.4)
- Removing sniffio (1.3.1)
- Removing starlette (0.41.3)
- Removing typing-extensions (4.12.2)

Writing lock file
  • search : 搜索远程仓库

1
2
# 搜索远程仓库
$ poetry search fastapi
  • install 和 update : 安装和更新依赖包
    在 Poetry 中,install 和 update 是两个常用的命令,但它们的作用和使用场景不同

    • poetry install 的作用是根据现有的 poetry.lock 文件来安装依赖,确保安装的依赖版本与锁文件中记录的版本完全一致。
      核心特点:

      • 安装锁定的版本:它只会安装 poetry.lock 文件中指定的版本,即使 pyproject.toml 文件中定义的版本范围已经有更新版本。
      • 重现依赖环境:适用于团队协作或部署环境,确保所有人或机器安装的依赖版本完全相同。
      • 锁文件存在时更高效:如果 poetry.lock 文件存在,poetry install 不会重新解析依赖树。
      • 首次运行时生成锁文件:如果没有 poetry.lock 文件,poetry install 会解析依赖并生成锁文件。
        使用场景:
      • 新克隆的项目,需要安装依赖环境。
      • 部署生产环境,确保依赖版本的稳定性。
      • 重新安装之前已定义的依赖(例如清空了虚拟环境)。
    • poetry update 的作用是根据 pyproject.toml 文件中定义的依赖范围重新解析依赖树,并更新 poetry.lock 文件为最新的版本。
      核心特点:

      • 更新到最新版本:它会尝试安装依赖范围内的最新版本,并更新 poetry.lock 文件。
      • 解析新的依赖树:即使 poetry.lock 文件存在,poetry update 也会忽略它并重新解析依赖。
      • 更改锁文件:它会覆盖现有的 poetry.lock 文件,因此团队其他成员需要重新运行 poetry install 以同步。
        使用场景:
      • 更新依赖到最新版本(在依赖范围内)。
      • 当添加新依赖后,想要安装并更新锁文件。
      • 修复可能的版本冲突或不兼容问题。

lock : 锁定依赖包

  • poetry lock 是 Poetry(一个 Python 包管理工具)中的一个命令,用于锁定项目的依赖关系。使用这个命令可以创建或更新 poetry.lock 文件,确保你的项目中所使用的每个包的版本都被明确记录下来。这样做对于项目的可复现性和稳定性至关重要。

  • 实际上,当运行 poetry installpoetry update 或者 poetry add 等命令时, poetry 都会根据
    pyproject.toml 文件中的依赖范围,解析依赖树,并在项目目录下创建或更新 poetry.lock 文件。

  • 当我们手工修改了 pyproject.toml 文件中的依赖范围,此时又不想立刻更新依赖,而是希望在某个时机再更新,此时就可以使用 poetry lock 命令,先锁定这些依赖,之后再通过 poetry install 命令安装。

  • 可以使用 poetry check 命令检查 pyproject.toml 文件 与 poetry.lock 文件的一致性。

1
2
3
4
5
6
7
8
9
10
11
12
13
# 比如我手工删除了 `pyproject.toml` 文件中的某个依赖
# 此时运行 check 检查一致性会报错
$ poetry check
Error: pyproject.toml changed significantly since poetry.lock was last generated. Run `poetry lock [--no-update]` to fix the lock file.
# 锁定依赖
$ poetry lock
Updating dependencies
Resolving dependencies... (0.1s)

Writing lock file
# 检查一致性通过
$ poetry check
All set!

小贴士

  • 注意,此时通过 poetry show 查看不到那个手工删除的依赖包,但实际上依赖依旧在于虚拟环境中
  • 所以尽量避免手工删除依赖,而是通过 poetry remove 命令来删除依赖

source : 镜像源管理

  • 默认情况下都是从Pypi的官方仓库下载,国内一般需要指定镜像源来加速下载

1
2
3
4
5
6
7
8
9
10
11
12
13
14
15
16
17
18
19
20
21
22
23
24
25
26
27
28
29
30
31
32
33
# 添加镜像源,默认就是主要源,注意该方式只对当前项目有效
# 命令格式:poetry source add [选项] [--] <name> [<url>],name:源仓库的名称,url:源仓库的 URL
$ poetry source add tsinghua https://pypi.tuna.tsinghua.edu.cn/simple
Adding source with name tsinghua.

# --priority=PRIORITY设置此源的优先级。可以是以下值之一:default(默认)、primary(主要)、supplemental(备用)、explicit(显式源,只有当包明确声明使用该源时才会被使用)。默认为 primary。
$ poetry source add --priority=supplemental aliyun http://mirrors.aliyun.com/pypi/simple/

# 查看镜像源信息
$ poetry source show
name : tsinghua
url : https://pypi.tuna.tsinghua.edu.cn/simple
priority : primary

name : aliyun
url : http://mirrors.aliyun.com/pypi/simple/
priority : supplemental

# 此时查看 pyproject.toml 文件可以看到镜像源信息
[[tool.poetry.source]]
name = "tsinghua"
url = "https://pypi.tuna.tsinghua.edu.cn/simple"
priority = "primary"


[[tool.poetry.source]]
name = "aliyun"
url = "http://mirrors.aliyun.com/pypi/simple/"
priority = "supplemental"

# 删除镜像源
$ poetry source remove aliyun # 指定镜像源名称
Removing source with name aliyun.

运行

这里以一个小示例来说明这个功能

  • 创建一个新的项目

1
2
3
4
5
6
7
8
9
10
11
12
13
14
15
16
17
18
19
20
21
$ poetry new poetryDemo
Created package poetrydemo in poetryDemo
# 进入项目目录
$ cd poetryDemo
# 查看生成的文件
$ ll
total 8
drwxr-xr-x 6 hanqf staff 192 11 21 17:32 .
drwxr-xr-x 4 hanqf staff 128 11 21 17:32 ..
-rw-r--r-- 1 hanqf staff 0 11 21 17:32 README.md
drwxr-xr-x 3 hanqf staff 96 11 21 17:32 poetrydemo
-rw-r--r-- 1 hanqf staff 266 11 21 17:32 pyproject.toml
drwxr-xr-x 3 hanqf staff 96 11 21 17:32 tests
# 进入包目录
$ cd poetrydemo
# 查看包目录下的文件
$ ll
total 0
drwxr-xr-x 3 hanqf staff 96 11 21 17:32 .
drwxr-xr-x 6 hanqf staff 192 11 21 17:32 ..
-rw-r--r-- 1 hanqf staff 0 11 21 17:32 __init__.py
  • 在包目录下创建 array_util.py,内容如下

1
2
3
4
5
6
7
8
9
10
11
12
13
14
15
16
17
18
19
20
21
22
23
24
25
26
27
28
29
30
31
32
33
34
35
36
37
38
39
40
41
42
43
44
45
46
47
48
49
50
51
52
import numpy as np

def generate_random_array(shape, distribution="uniform", params=None, seed=None):
"""
生成随机数组的工具方法。

:param shape: tuple,指定数组的形状,例如 (3, 4) 表示 3 行 4 列。
:param distribution: str,指定随机数分布类型,可选值:
- "uniform":均匀分布(默认)。
- "normal":正态分布。
- "integer":随机整数。
:param params: dict,分布的参数配置:
- 均匀分布:{"low": 最小值, "high": 最大值},默认 low=0, high=1。
- 正态分布:{"mean": 均值, "std": 标准差},默认 mean=0, std=1。
- 随机整数:{"low": 最小值, "high": 最大值, "dtype": 类型},默认 low=0, high=10。
:param seed: int,随机数种子(可选),用于结果可复现。
:return: np.ndarray,生成的随机数组。
"""
if seed is not None:
np.random.seed(seed)

if params is None:
params = {}

if distribution == "uniform":
low = params.get("low", 0)
high = params.get("high", 1)
return np.random.uniform(low, high, size=shape)

elif distribution == "normal":
mean = params.get("mean", 0)
std = params.get("std", 1)
return np.random.normal(mean, std, size=shape)

elif distribution == "integer":
low = params.get("low", 0)
high = params.get("high", 10)
dtype = params.get("dtype", int)
return np.random.randint(low, high, size=shape, dtype=dtype)

else:
raise ValueError("不支持的分布类型!可选值为 'uniform', 'normal', 'integer'。")

# 示例用法
if __name__ == "__main__":
array_uniform = generate_random_array((3, 4), distribution="uniform", params={"low": 1, "high": 10})
array_normal = generate_random_array((2, 3), distribution="normal", params={"mean": 0, "std": 1}, seed=42)
array_integer = generate_random_array((4, 5), distribution="integer", params={"low": 0, "high": 20})

print("均匀分布随机数组:\n", array_uniform)
print("正态分布随机数组:\n", array_normal)
print("随机整数数组:\n", array_integer)
  • 安装依赖

1
2
3
4
5
6
7
8
9
10
11
$ poetry add numpy
Using version ^2.1.3 for numpy

Updating dependencies
Resolving dependencies... (1.1s)

Package operations: 1 install, 0 updates, 0 removals

- Installing numpy (2.1.3)

Writing lock file
  • 运行,两种方法

    • poetry run
    1
    2
    3
    4
    5
    6
    7
    8
    9
    10
    11
    12
    13
    $ poetry run python array_util.py
    均匀分布随机数组:
    [[7.44623063 1.89415788 4.81008329 4.25556572]
    [3.31925154 6.44037063 5.3216543 7.54950573]
    [3.97160747 5.04800698 3.28299934 3.42841887]]
    正态分布随机数组:
    [[ 0.49671415 -0.1382643 0.64768854]
    [ 1.52302986 -0.23415337 -0.23413696]]
    随机整数数组:
    [[10 10 3 7 2]
    [ 1 11 5 1 0]
    [11 11 16 9 15]
    [14 14 18 11 19]]
    • poetry shell : 此时会开启一个新的shell,并开启虚拟环境
    1
    2
    3
    4
    5
    6
    7
    # 开启虚拟环境
    $ poetry shell
    Spawning shell within /Users/hanqf/Library/Caches/pypoetry/virtualenvs/poetrydemo-fyqYbfje-py3.11
    Restored session: 2024年11月21日 星期四 15时31分52秒 CST
    ➜ poetrydemo emulate bash -c '. /Users/hanqf/Library/Caches/pypoetry/virtualenvs/poetrydemo-fyqYbfje-py3.11/bin/activate'
    # 在虚拟环境下运行
    $ python array_util.py

打包和发布

  • 接着上面的项目

  • 打包

1
2
3
4
5
6
7
8
9
10
11
12
# 会在项目目录下创建 dist 目录,并将打好的包存放于此
$ poetry build
Building poetrydemo (0.1.0)
- Building sdist
- Built poetrydemo-0.1.0.tar.gz
- Building wheel
- Built poetrydemo-0.1.0-py3-none-any.whl

# 查看生成的打包文件
$ exa -1 dist
hqf_poetrydemo-0.1.0-py3-none-any.whl
hqf_poetrydemo-0.1.0.tar.gz
  • 发布

  • 首先要先在PyPI上注册个帐号,需要开启“双要素身份验证 (2FA)”,否则不能获取发布时的API令牌。

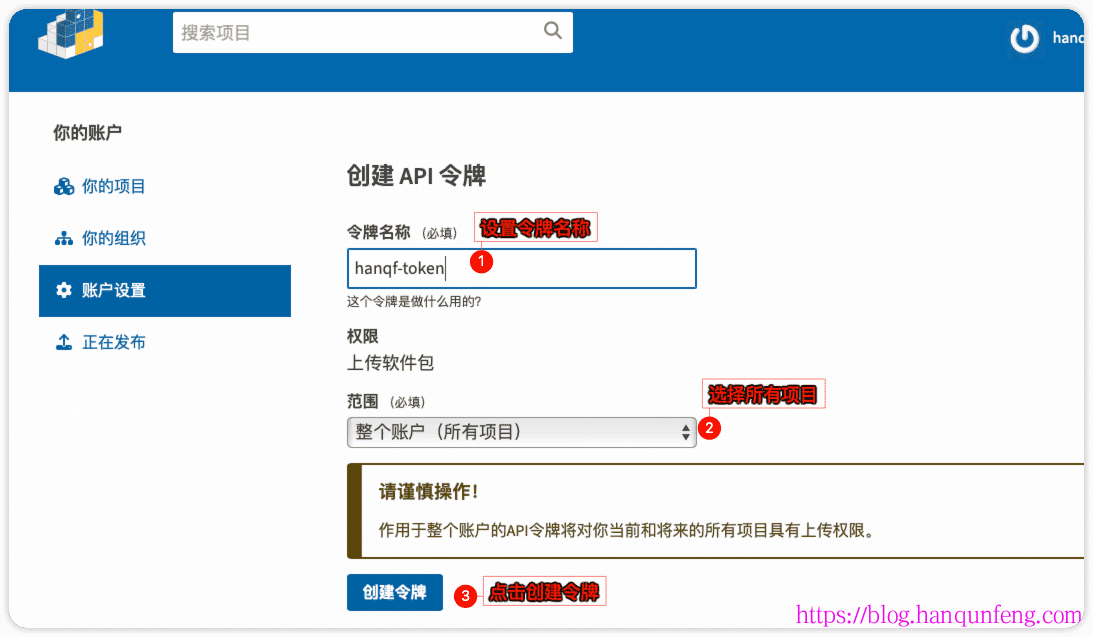
  • 获取API令牌

  • 发布,不过这次发布提示包名已经存在了

1
2
3
4
5
6
# 发布时提示包名已经存在了
$ poetry publish -u __token__ -p pypi-AgEIcHlwaS5vcmcCJDU0Y2Q5NjhkLWYyYTEtN
Publishing poetrydemo (0.1.0) to PyPI
- Uploading poetrydemo-0.1.0-py3-none-any.whl FAILED

HTTP Error 400: The name 'poetrydemo' is too similar to an existing project. See https://pypi.org/help/#project-name for more information. | b"<html>\n <head>\n <title>400 The name 'poetrydemo' is too similar to an existing project. See https://pypi.org/help/#project-name for more information.\n \n <body>\n <h1>400 The name 'poetrydemo' is too similar to an existing project. See https://pypi.org/help/#project-name for more information.\n The server could not comply with the request since it is either malformed or otherwise incorrect.<br/><br/>\nThe name &#x27;poetrydemo&#x27; is too similar to an existing project. See https://pypi.org/help/#project-name for more information.\n\n\n \n"
  • 先修改包名,直接编辑 pyproject.toml 即可,将name属性修改为“hqf_poetrydemo”,然后将包目录的名称也修改为这个mv poetrydemo hqf_poetrydemo,并删除dist目录,之后重新打包poetry build,再次发布

1
2
3
4
5
6
7
8
9
10
11
12
13
14
15
16
17
$ vim pyproject.toml # 将name属性修改为“hqf_poetrydemo”
$ mv poetrydemo hqf_poetrydemo # 将包目录的名称也修改为这个
$ rm -rf dist # 删除dist目录
$ poetry build # 重新打包
Creating virtualenv hqf-poetrydemo-fyqYbfje-py3.11 in /Users/hanqf/Library/Caches/pypoetry/virtualenvs
Building hqf_poetrydemo (0.1.0)
- Building sdist
- Built hqf_poetrydemo-0.1.0.tar.gz
- Building wheel
- Built hqf_poetrydemo-0.1.0-py3-none-any.whl

# 再次发布
$ poetry publish -u __token__ -p pypi-AgEIcHlwaS5vcmcCJDU0Y2Q5NjhkLWYyYTEtN

Publishing hqf_poetrydemo (0.1.0) to PyPI
- Uploading hqf_poetrydemo-0.1.0-py3-none-any.whl 100%
- Uploading hqf_poetrydemo-0.1.0.tar.gz 100%

  • 之后就可以在其它项目中安装这个包了

1
2
3
4
5
6
7
8
9
10
11
12
13
14
15
16
# pip install
$ pip install hqf_poetrydemo

# poetry add
$ poetry add hqf_poetrydemo
Using version ^0.1.0 for hqf-poetrydemo

Updating dependencies
Resolving dependencies... (0.5s)

Package operations: 2 installs, 0 updates, 0 removals

- Installing numpy (2.1.3)
- Installing hqf-poetrydemo (0.1.0)

Writing lock file

self update : 升级 poetry 版本

  • self 相关命令主要用于 poetry 自身安装插件使用

  • 估计插件功能目前还不成熟,官网也没有进行详细的说明,并且 windows 下无法使用,所以这里不讨论。

  • self命令下目前只需要记住一个命令: self update : 升级 poetry 版本

1
$ poetry self update

debug resolve : 查看包的依赖关系

1
2
3
4
5
6
7
8
9
10
11
12
13
14
# 只查看,不安装
$ poetry debug resolve requests
Resolving dependencies... (0.4s)

Resolution results:

certifi 2024.8.30
charset-normalizer 3.4.0
idna 3.10
urllib3 2.2.3
requests 2.32.3

# 查看指定版本的依赖关系
$ poetry debug resolve requests@2.32.3

cache : 缓存管理

  • poetry一个很重要的功能就是缓存安装包,可以 减少 相同的安装包被重复下载。为什么是减少而不是避免呢?因为不同的镜像源的包是分别缓存的。

  • 通过 poetry config --list 可以看到 cache-dir 的地址,这里就是缓存下载包的目录。

  • 以下是一些常见的使用场景

    • 解决依赖安装问题:
      如果你在安装或更新依赖时遇到问题(例如,某个包无法正确安装或版本不对),清空缓存可以帮助你确保 Poetry 重新下载所有必要的文件,从而解决问题。
    • 清理磁盘空间:
      如果你的项目很多或者经常修改依赖项,缓存可能会变得非常大。使用 poetry cache clear 可以帮助释放磁盘空间,特别是当你不经常使用某些包时。
    • 测试最新版本的依赖:
      如果你想测试某个包的新版本是否解决了某个问题,或者想确保你使用的确实是最新的版本,清除缓存可以强制 Poetry 从远程仓库重新下载最新的包。
    • 环境变化:
      如果你的开发或生产环境发生了变化(例如,切换了操作系统、更新了 Python 版本等),清除缓存可以帮助你确保依赖项在新环境中正确安装。
    • 调试依赖问题:
      在调试依赖项问题时,有时候清除缓存可以帮助你确定问题是否与缓存中的旧版本有关。
    • CI/CD 环境的一致性:
      在持续集成或持续部署 (CI/CD) 环境中,为了确保每次构建都基于最新的依赖,有时会在构建脚本中包含清除缓存的步骤。
1
2
3
4
5
6
7
8
9
10
11
# 查看缓存列表,这里会按镜像源进行分组
$ poetry cache list
PyPI
_default_cache
tsinghua

# 清除指定源的全部缓存
$ poetry cache clear pypi --all

# 清除指定源下某个包的缓存
$ poetry cache clear pypi:requests:2.24.0