AWS-EKS-18--Autoscaling 之 Cluster Autoscaler(CAS)

摘要

EKS集群Autoscaling

Cluster Autoscaler(CAS)是什么?

  • Cluster Autoscaler 是一个可以自动调整Kubernetes集群大小的组件,以便所有pod都有运行的地方,并且没有不需要的节点。支持多个公共云提供商。

  • AWS EKS集群自动扩容功能可以基于Cluster Autoscaler自动调整集群中node的数量以适应需求变化。

  • Cluster Autoscaler一般以Deployment的方式部署在K8s中,通过service account赋予的权限来访问AWS autoscaling group资源,并控制node(EC2)的增减。

  • AWS EKS Cluster AutoscalerAmazon EC2 Auto Scaling Groups服务为基础对node进行扩容,所以其扩容或缩容时,也要遵守节点组扩缩中的配置

  • 当有新的Pod无法在现有node上schedule时会触发扩容,当node空闲超过10min时,会触发缩容。

  • Cluster Autoscaler的镜像版本要求与K8s版本匹配,所以当EKS(K8s)升级时,Cluster Autoscaler的镜像也要进行升级。

创建IAM策略和角色

  • 创建Policy:cluster-autoscaler-policy.json

1
2
3
4
5
6
7
8
9
10
11
12
13
14
15
16
17
18
19
20
21
22
23
24
25
26
27
28
29
{
"Version": "2012-10-17",
"Statement": [
{
"Effect": "Allow",
"Action": [
"autoscaling:DescribeAutoScalingGroups",
"autoscaling:DescribeAutoScalingInstances",
"autoscaling:DescribeLaunchConfigurations",
"autoscaling:DescribeScalingActivities",
"autoscaling:DescribeTags",
"ec2:DescribeInstanceTypes",
"ec2:DescribeLaunchTemplateVersions"
],
"Resource": ["*"]
},
{
"Effect": "Allow",
"Action": [
"autoscaling:SetDesiredCapacity",
"autoscaling:TerminateInstanceInAutoScalingGroup",
"ec2:DescribeImages",
"ec2:GetInstanceTypesFromInstanceRequirements",
"eks:DescribeNodegroup"
],
"Resource": ["*"]
}
]
}
1
2
3
4
5
6
7
8
9
10
11
12
13
14
15
16
17
18
$ export AWS_PROFILE=eks-ty-old
$ aws iam create-policy \
--policy-name AmazonEKSClusterAutoscalerPolicy \
--policy-document file://cluster-autoscaler-policy.json
{
"Policy": {
"PolicyName": "AmazonEKSClusterAutoscalerPolicy",
"PolicyId": "ANPA22DP3G4GBZ4RXQA2J",
"Arn": "arn:aws:iam::743263909644:policy/AmazonEKSClusterAutoscalerPolicy",
"Path": "/",
"DefaultVersionId": "v1",
"AttachmentCount": 0,
"PermissionsBoundaryUsageCount": 0,
"IsAttachable": true,
"CreateDate": "2023-07-18T09:31:24+00:00",
"UpdateDate": "2023-07-18T09:31:24+00:00"
}
}
  • 创建IAM Role的信任关系:trust-policy.json

1
2
3
4
5
6
7
8
9
10
11
12
13
14
15
16
17
18
{
"Version": "2012-10-17",
"Statement": [
{
"Effect": "Allow",
"Principal": {
"Federated": "arn:aws:iam::743263909644:oidc-provider/oidc.eks.us-west-2.amazonaws.com/id/1029FF88CB872B6B7A1CC65D44191A56"
},
"Action": "sts:AssumeRoleWithWebIdentity",
"Condition": {
"StringEquals": {
"oidc.eks.us-west-2.amazonaws.com/id/1029FF88CB872B6B7A1CC65D44191A56:aud": "sts.amazonaws.com",
"oidc.eks.us-west-2.amazonaws.com/id/1029FF88CB872B6B7A1CC65D44191A56:sub": "system:serviceaccount:kube-system:cluster-autoscaler"
}
}
}
]
}
  • 创建 IAM Role

1
2
3
4
5
6
7
8
9
10
11
12
13
14
15
16
17
18
19
20
21
22
23
24
25
26
27
28
29
30
$ aws iam create-role \
--role-name AmazonEKSClusterAutoscalerRole \
--assume-role-policy-document file://"trust-policy.json"
{
"Role": {
"Path": "/",
"RoleName": "AmazonEKSClusterAutoscalerRole",
"RoleId": "AROA22DP3G4GHSSPEOMUH",
"Arn": "arn:aws:iam::743263909644:role/AmazonEKSClusterAutoscalerRole",
"CreateDate": "2023-07-18T09:39:54+00:00",
"AssumeRolePolicyDocument": {
"Version": "2012-10-17",
"Statement": [
{
"Effect": "Allow",
"Principal": {
"Federated": "arn:aws:iam::743263909644:oidc-provider/oidc.eks.us-west-2.amazonaws.com/id/1029FF88CB872B6B7A1CC65D44191A56"
},
"Action": "sts:AssumeRoleWithWebIdentity",
"Condition": {
"StringEquals": {
"oidc.eks.us-west-2.amazonaws.com/id/1029FF88CB872B6B7A1CC65D44191A56:aud": "sts.amazonaws.com",
"oidc.eks.us-west-2.amazonaws.com/id/1029FF88CB872B6B7A1CC65D44191A56:sub": "system:serviceaccount:kube-system:cluster-autoscaler"
}
}
}
]
}
}
}
  • 为 Role 添加 Policy

1
2
3
$ aws iam attach-role-policy \
--policy-arn arn:aws:iam::743263909644:policy/AmazonEKSClusterAutoscalerPolicy \
--role-name AmazonEKSClusterAutoscalerRole

部署Cluster Autoscaler

  • 下载Autoscaler yaml文件

1
2
3
4
5
#下载yaml文件,github仓库中的文件下载路径格式为:https://raw.githubusercontent.com/<Owner>/<RepositoryName>/<branch>/<FilePath>
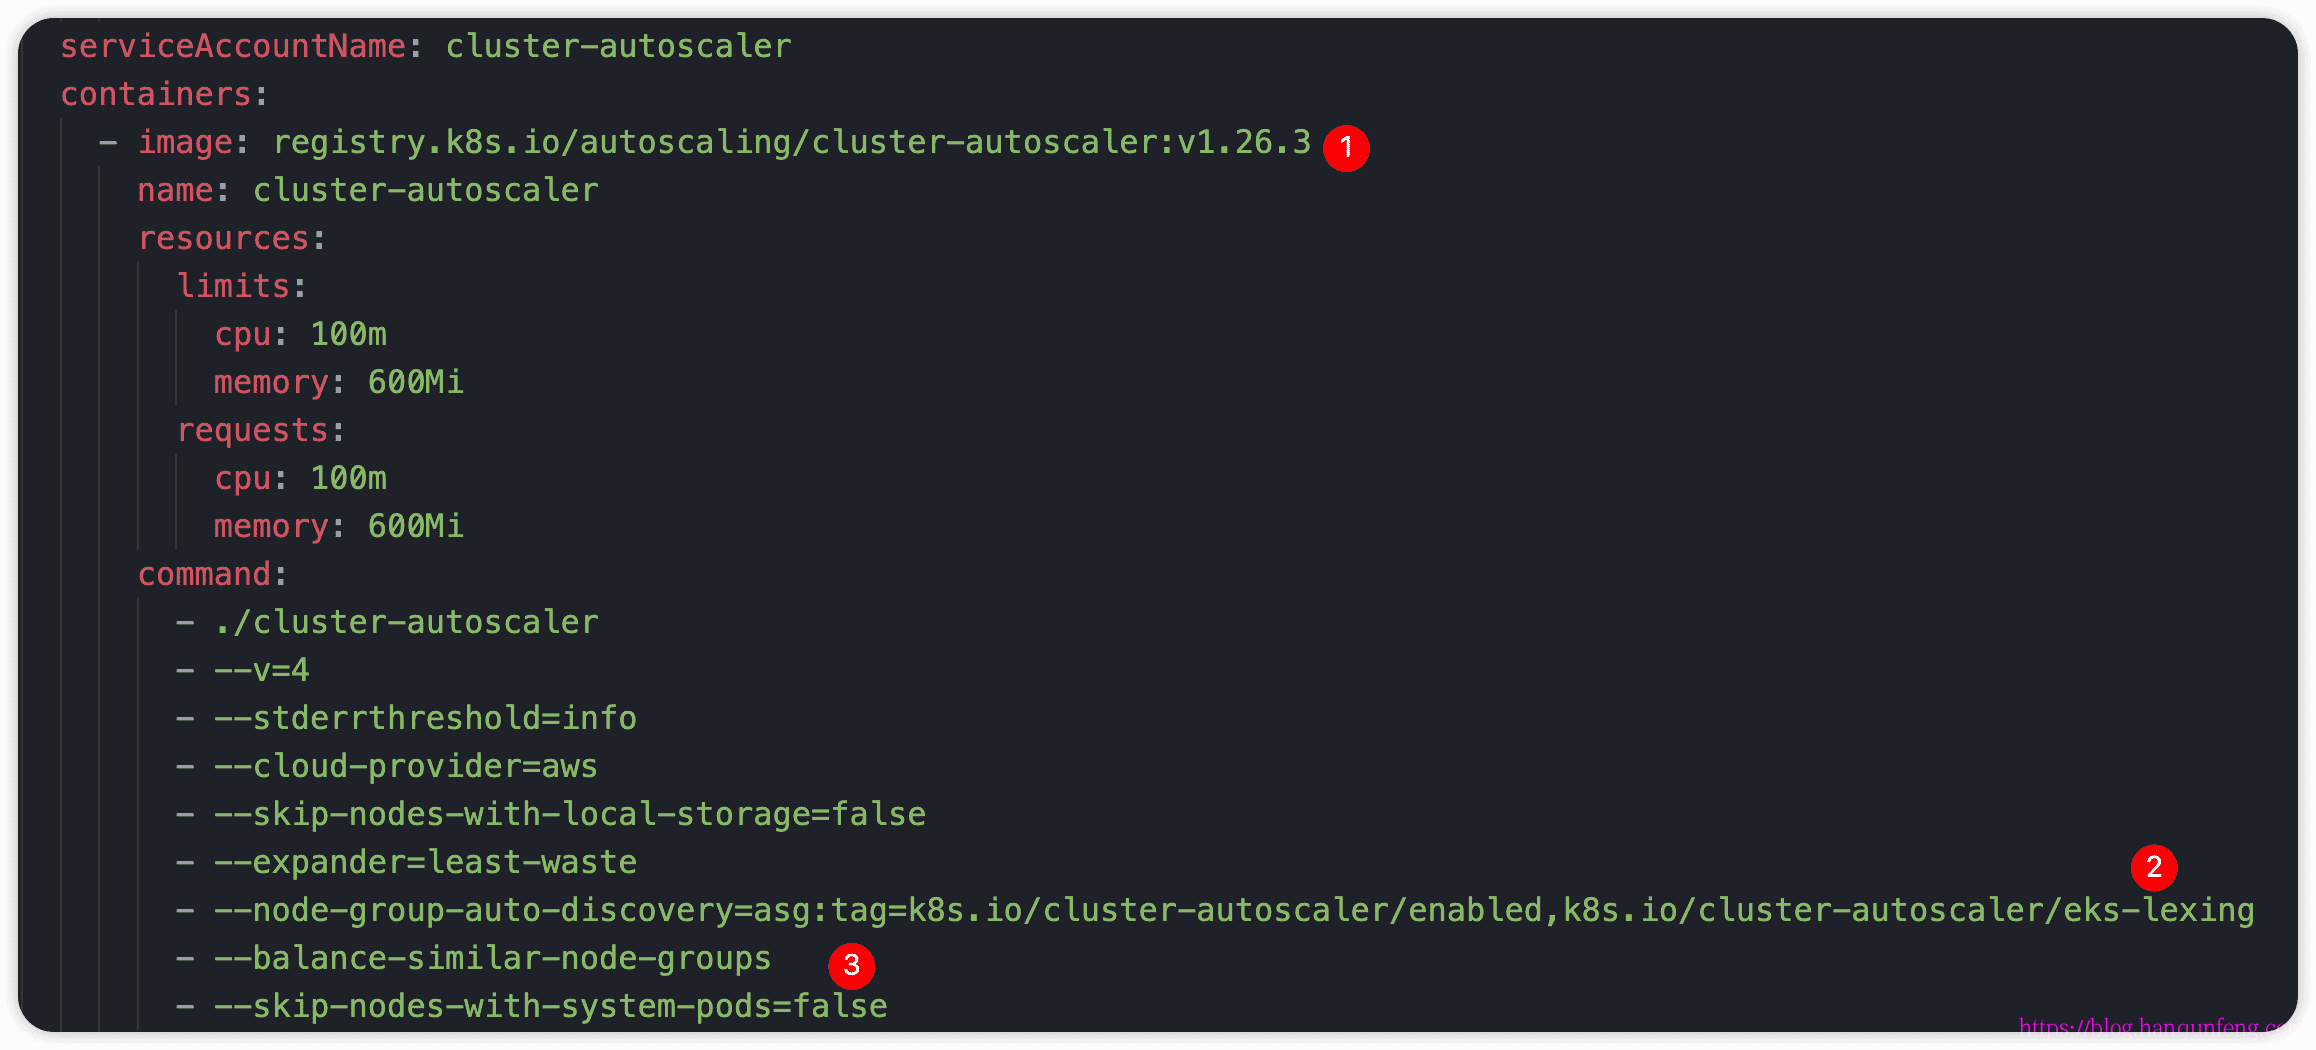
$ wget https://raw.githubusercontent.com/kubernetes/autoscaler/master/cluster-autoscaler/cloudprovider/aws/examples/cluster-autoscaler-autodiscover.yaml

# 获取使用git命令,这里只clone出指定文件
$ git clone --depth 1 https://github.com/kubernetes/autoscaler --branch master --single-branch cluster-autoscaler/cloudprovider/aws/examples/cluster-autoscaler-autodiscover.yaml
  • 修改yaml文件配置
    打开Cluster Autoscalergithub地址,查看与EKS版本匹配的最新Autoscaler镜像版本

    • 1.把cluster-autoscaler的镜像版本换成上面查到的版本1.26.3
    • 2.查找并替换“”为我们EKS的名称: eks-lexing
    • 3.在EKS的名称“tsEKS”下面,并添加以下两行
    1
    2
    - --balance-similar-node-groups
    - --skip-nodes-with-system-pods=false

    --balance-similar-node-groups:此选项用于启用集群节点组的负载均衡功能。当你有多个具有相似容量的节点组时,启用此选项可以确保 Cluster Autoscaler 尽可能均衡地在这些节点组之间分配 Pod。它帮助确保节点组的资源利用率更加平衡,以提高集群的整体性能。
    --skip-nodes-with-system-pods=false:此选项用于设置是否跳过具有系统 Pod 的节点。默认情况下,Cluster Autoscaler 会跳过具有系统 Pod(如 kube-system 命名空间中的核心组件)的节点,以确保这些关键组件的正常运行。将该选项设置为 false,即禁用跳过具有系统 Pod 的节点,可以让 Cluster Autoscaler 考虑包括具有系统 Pod 的节点在内的所有节点进行调整。

    • 4.为ServiceAccount添加IMA Role注解,注意一定要添加这个注解后再进行部署,否则会提示没有权限

  • 部署Cluster Autoscaler

1
2
3
4
5
6
7
$ kubectl apply -f cluster-autoscaler-autodiscover.yaml
serviceaccount/cluster-autoscaler created
clusterrole.rbac.authorization.k8s.io/cluster-autoscaler created
role.rbac.authorization.k8s.io/cluster-autoscaler created
clusterrolebinding.rbac.authorization.k8s.io/cluster-autoscaler created
rolebinding.rbac.authorization.k8s.io/cluster-autoscaler created
deployment.apps/cluster-autoscaler created
  • 查看Cluster Autoscaler Deployment

1
2
3
4
5
6
7
8
9
# cluster-autoscaler
$ k get deploy
NAME READY UP-TO-DATE AVAILABLE AGE
aws-load-balancer-controller 2/2 2 2 14d
cluster-autoscaler 1/1 1 1 9m10s
coredns 2/2 2 2 20d
ebs-csi-controller 2/2 2 2 20d
efs-csi-controller 2/2 2 2 15d
metrics-server 1/1 1 1 20d
  • 给autoscaler deployment打patch,增加annotation

1
2
3
4
5
6
# 这个注解的作用是告诉 Kubernetes 系统不要将这些 Pod 标记为可以被安全驱逐(evict)的 Pod。
# 通过将 cluster-autoscaler 部署的 Pod 标记为不可安全驱逐,可以避免 Cluster Autoscaler 将这些关键组件的 Pod 视为可以被删除的对象。
$ kubectl patch deployment cluster-autoscaler \
-n kube-system \
-p '{"spec":{"template":{"metadata":{"annotations":{"cluster-autoscaler.kubernetes.io/safe-to-evict": "false"}}}}}'
deployment.apps/cluster-autoscaler patched

测试

  • 查看当前node节点

1
2
3
4
$ k get node
NAME STATUS ROLES AGE VERSION
ip-192-168-16-155.us-west-2.compute.internal Ready <none> 18d v1.26.4-eks-0a21954
ip-192-168-48-14.us-west-2.compute.internal Ready <none> 18d v1.26.4-eks-0a21954
  • 创建测试用的deployment:testDeploy.yaml

1
2
3
4
5
6
7
8
9
10
11
12
13
14
15
16
17
18
19
20
21
22
apiVersion: apps/v1
kind: Deployment
metadata:
name: nginx-deployment
namespace: test
labels:
app: nginx
spec:
replicas: 1
selector:
matchLabels:
app: nginx
template:
metadata:
labels:
app: nginx
spec:
containers:
- name: nginx
image: nginx:1.20.2
ports:
- containerPort: 80
1
2
3
4
5
6
$ k apply -f testDeploy.yaml
deployment.apps/nginx-deployment created

# 扩容
# 因为我这里的节点实例类型为 m5.large,所以replicas要设置的大一些
k scale deploy nginx-deployment --replicas 50 -n test
  • 过一会查看node情况

1
2
3
4
5
6
7
8
9
10
11
12
13
14
15
16
17
18
19
20
21
22
23
24
25
26
# 可以看到新创建了一个node节点
$ k get node
NAME STATUS ROLES AGE VERSION
ip-192-168-16-155.us-west-2.compute.internal Ready <none> 18d v1.26.4-eks-0a21954
ip-192-168-48-14.us-west-2.compute.internal Ready <none> 18d v1.26.4-eks-0a21954
ip-192-168-86-167.us-west-2.compute.internal Ready <none> 68s v1.26.4-eks-0a21954

# pod也都正常运行
$ k get pod -n test
NAME READY STATUS RESTARTS AGE
nginx-deployment-7876b754ff-2nd5k 1/1 Running 0 111s
nginx-deployment-7876b754ff-2ppvw 1/1 Running 0 111s
nginx-deployment-7876b754ff-45csw 1/1 Running 0 110s
nginx-deployment-7876b754ff-46tmf 1/1 Running 0 111s
nginx-deployment-7876b754ff-5vt8p 1/1 Running 0 110s
nginx-deployment-7876b754ff-66ztw 1/1 Running 0 111s
nginx-deployment-7876b754ff-77f4d 1/1 Running 0 110s
nginx-deployment-7876b754ff-8jj92 1/1 Running 0 111s
nginx-deployment-7876b754ff-8kj97 1/1 Running 0 111s
nginx-deployment-7876b754ff-9c8kr 1/1 Running 0 111s
nginx-deployment-7876b754ff-9szmq 1/1 Running 0 111s
nginx-deployment-7876b754ff-blbqd 1/1 Running 0 111s
nginx-deployment-7876b754ff-bpppd 1/1 Running 0 111s
nginx-deployment-7876b754ff-c46sb 1/1 Running 0 111s
nginx-deployment-7876b754ff-d5b45 1/1 Running 0 111s
………………………………
  • 缩容deploy

1
2
3
4
5
6
# 将副本降为1
$ k scale deploy nginx-deployment --replicas 1 -n test

# 测试完成可以删除
$ k delete -f testDeploy.yaml
deployment.apps "nginx-deployment" deleted
  • 大约过10几分钟就可以看到新增的node已经下线

1
2
3
4
$ k get node
NAME STATUS ROLES AGE VERSION
ip-192-168-16-155.us-west-2.compute.internal Ready <none> 18d v1.26.4-eks-0a21954
ip-192-168-48-14.us-west-2.compute.internal Ready <none> 18d v1.26.4-eks-0a21954

升级Cluster Autoscaler

  • Cluster Autoscaler的镜像版本要求与K8s版本匹配,所以当EKS(K8s)升级时,Cluster Autoscaler的镜像也要进行升级。

1
2
3
4
5
$ kubectl set image deployment cluster-autoscaler \
-n kube-system \
cluster-autoscaler=registry.k8s.io/autoscaling/cluster-autoscaler:v<x.x.x>
# 或者直接编辑也是可以的
$ k edit deploy -n kube-system cluster-autoscaler

关闭Cluster Autoscaler

1
2
3
4
5
6
7
8
9
10
11
$ k scale deploy cluster-autoscaler -n kube-system --replicas 0
deployment.apps/cluster-autoscaler scaled

$ k get deploy
NAME READY UP-TO-DATE AVAILABLE AGE
aws-load-balancer-controller 2/2 2 2 14d
cluster-autoscaler 0/0 0 0 20h
coredns 2/2 2 2 21d
ebs-csi-controller 2/2 2 2 20d
efs-csi-controller 2/2 2 2 15d
metrics-server 1/1 1 1 21d